Pages

Tuesday, March 30, 2010

Snuggly Ribbon Blanket

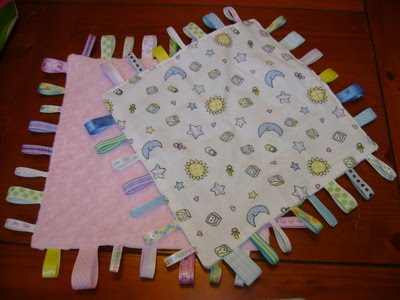
I was kind of excited when I saw this project.  This one is not actually new to me.  I have made these before for friends and family when there is a new baby on the way.  So, a challenge...this was not.  But, what great timing.  A friend of mine recently had twins..a boy and a girl.  Hence, I immediately knew who I could make these for.  I wanted to embroider their names on the minky side of the blankets, but as I said last week...I am reorganizing my sewing room and can't get to the embroidery machine right now.  Maybe next time.  I wanted to make them different, but the same (since they are twins and all)...so I used the same front piece of fabric that works for boys or girls and backed one with a blue minky dot and the other with a pink minky dot.  I also used some of the same ribbons for both...but added more blue ribbons on the boy blanket and more pink ribbons on the girl blanket.  I think they turned out pretty cute.  This really is not a complicated project to put together, but can be a little time consuming when cutting out, pinning the ribbons and basting the ribbons.  Still, it didn't take that long.  Plus, I know my nephews and cousins loved these.  It is just the perfect size for an infant to cuddle with and all the ribbons make it easy for the baby to grab on to the blanket...you know, since they are still figuring out how their hands work.


This project was provided by Sarah Mikkelsen at http://www.themikkelsens.net/sarah/journal/.

Monday, March 29, 2010

Bow Tie Hair Clips

This was, so far, the easiest challenge yet.  Literally took 10 minutes!!  The problem is, the only person that I know that wears these type of hair clips is my mom and I know she won't wear them with a cute little bow on them.  (Even though she did humor me and wear it all afternoon today.) My hair is way to thin for one of these things to contain it and my one and only niece is a bit too old to wear something like this.  So, I only made one to get a picture of it.  Now, sadly it will sit in a drawer for months to come until I finally clean that drawer out and toss it.  But, for those of you with little girls in your life who do wear cute hair accessories...what a cheap and easy way to make them a unique and adorable gift!!


This project was provided by Lauren Brandy at http://goodygoody.typepad.com/.

Why dost thou hate me so?

Here I am all excited to get caught up on my challenges, with four...that's right FOUR!...done and ready to post and for some reason the blogging gods have chosen to work against me!  All weekend I tried and tried to get on here to post and every single time I was denied.  No internet connection.  For the whole weekend!  So finally today I am able to get online and what do I discover?  The Google server is experiencing difficulties and I can't upload any images!  Seriously?!? I mean, Seriously!!!!  What's a girl to do?  Hopefully all will be right with the blogger world later today.

Saturday, March 27, 2010

Sewn Invitations

So there I was, all dressed up, ready to party and no place to invite you to.  And by all dressed up, I mean chilling at home in my oh-so-comfy yoga pants, an oversized "Rock Chalk Jayhawk, Go KU" T-shirt and hot pink slippers that don't match anything else I have on.  And by ready to party, I mean popcorn is popped, the blanket is calling my name and the DVR is full and ready to entertain.  But, I digress.


Over the last few years, I have watched the scrapbooking movement grow and grow and almost take over some of the craft stores in our area.  I refused to join in this hobby.  As you can see from the last post, I have a room full of fabric and sewing supplies...I certainly don't need another room full of paper and scrapbooking supplies.  However, I do like that this mixes the two together.  Some scrapbooking and some sewing.  I probably wouldn't make a stack of invitations this way, but for this one invite...it was a fun and different project from what I am used to. (Except for the sewn valentines card I made a few weeks ago) 


It wasn't difficult by any means...but it was a little time consuming.  Cutting out the designs from the fabric...interfacing the fabric pieces...the gluing and the sewing.  Not that this took an hour, but if I was making twenty or thirty birthday invitaions or worse....like wedding invitations....I could see this becoming an all day affair.  For those of you who aspire to achieve that goal, cheers to you!!  I shall have a drink in your honor.


This project was provided by Kathy Beymer at http://www.merrimentdesign.com/.

Friday, March 26, 2010

Buried in Projects


AHHHHH!! I cannot believe it has almost been two weeks since my last post. I am getting very, VERY, far behind in this challenge. Are you ready for the excuses??? Here's the deal. "I ran out of gas. I, I had a flat tire. I didn't have enough money for cab fare. My tux didn't come back from the cleaners. An old friend came in from out of town. Someone stole my car. There was an earthquake. A terrible flood. Locusts. It wasn't my fault, I SWEAR TO GOD!!!" Oh wait, maybe that was the Blues Brothers...not me. Seriously, here is the truth. My viewpoint on how quickly I can accomplish something tends to stretch the bounds of reality, almost to a breaking point. In my mind, I am a superstar...I can accomplish ten times the things I can in reality. The biggest problem is that my mind tends to win every time I battle with my reality. Hence, I bite off WAY more than I can chew!!! So, in the midst of my very-busy-never-have-enough-time-to-actually-finish-a-project schedule, I decided my sewing room could not continue to go on in the shape it is in. What shape is that you ask? DISASTER AREA!!


I am a little embarrassed to show you these pictures, because...well...look at them...WHAT A MESS! I swear I am not a slob!!! Anyway, as you can tell...it was time for a room makeover. So, I am in the process of rearranging and reorganizing this room. My sewing room should be my sanctuary, not my downfall. I need it to work with me instead of the other way around. Unfortunately, things had to get worse before they get better...so I won't even let you see how bad it is now while I am working on it. But, in a nut shell, I have very few places I can even walk in the room.


I am very hopeful, however, that by the end of the weekend I will have it looking clean, mean and pristine and I will proudly show off those pictures. Also, and perhaps I am being a little over ambitious...wouldn't be the first time, I hope to be fully caught up by Monday with the sewing challenges. So, keep posted...I should have a lot of new posts over the weekend!! (Keep your fingers crossed!!)


Friday, March 12, 2010

Recycled Bath Mat


A few years ago, I moved into a new house. The guest bathroom was in need of a shower curtain and no matter where I looked...I couldn't find the right one. I really wanted something with red in it, but not solid red. It seemed like everything I saw had either a maroon tint or a salmon tint to it. So, luckily, my wonderful mom stepped up and made me the perfect shower curtain for the room. I was able to find a great bath mat that worked. Red shag bath mat in the perfect matching color. However, my rambuncious not-so-little puppy, Duchess, felt the need to unravel it a few months ago. Needless to say, the guest bath has been incomplete for awhile now. So, when I saw this project sheet, I immediately had my fabric picked out without even having to go into my sewing room. (That never happens!!) I didn't have a black towel, but I was able to find a great deal at K-Mart on a cheap costing yet not cheap feeling towel. I am so thrilled with the way it turned out. Next up, I am going to replace the bath mat in the master bath with one of these. This time around, I won't overestimate my ability to line up both sides of the edging fabric. I did have to restitch a few spots on this bath mat. So, I recommend you stitch down one side first before folding the fabric over to the other side and top stitching it in place.
This project was provided by Kristen Couse of http://www.cakehousedesign.com/ and http://www.thenewnew.blogspot.com/.

Tooth Fairy Pillow


This is such a great project to make for any little tyke who is frequently being visited by the tooth fairy!! It is pretty quick to make and very easy. The pocket is the perfect size for either a baby tooth or money left by Little Miss Tooth Fairy. I used a small strip of ribbon so you can hang the pillow on the door or the bedpost, but you could also make this pillow without the ribbon...so you can tuck it under your pillow. I did change the tooth a bit from the original project sheet. I am the child of two dentists, so they helped me perfect the tooth shape. My nephews are a little young to need one of these, but when the time comes...I imagine they will each get one.
This project was provided by Missy Ballance at http://www.craftycarnival.com/.

Thursday, March 4, 2010

Pacifier Pouch


I have four nephews, one niece and another niece or nephew on the way. I can't speak for the one that is still in the oven, but as far as I know...out of the five of them, only one has taken a pacifier. To Connor, his binkie is just as important as food or water or even air. It is borderline criminal to leave home without it. So, when I saw this project I immediately thought of Connor. I decided to make him two pouches, one for mom and dad to carry and one for Connor to carry. Picking out fabric for Connor's pouch was a piece of cake...there are really only three possible choices. Should I use Elmo, Elmo or Elmo??? I also added a clip on Connor's so he can clip it to a belt loop. For his parents, I figured theirs should go with the diaper bag...so luckily I had a few scraps of Chief's fabric. Both of the pouches are lined in solid color fabric with iron on vinyl. This was pretty easy to make. Start to finish, I think I spent about 45 minutes making both of them.
This project was provided by Jana P. Nielson at http://www.lolaagain.blogspot.com/.